REVIEW · COPENHAGEN
Copenhagen City Of Lights PhotoWalks Tour
Book on Viator →Operated by Better Moments Photo Exploring · Bookable on Viator
Copenhagen’s night lights make your camera sing. I love how this private PhotoWalk lets a professional photographer guide you step-by-step, with real help on composition and exposure as the city turns from blue-hour glow to full-on lights. You’ll aim your lens at classic Copenhagen scenes like Nyhavn, the Queen’s Palace, the Opera House, and the Parliament area, all while the guide keeps the walk focused on getting images you actually want to print or share.
The trade-off is that the tour leans into night photography, which means you’ll need a tripod. Also, the timing is more about early night than deep darkness, so if you’re expecting a fully black sky in every season, plan your expectations around that blue-hour-to-night window.
In This Review
- Key points to know before you go
- Why Copenhagen’s blue hour matters for night photos
- Meeting at Nyhavn and ending near Kongens Nytorv
- What the guide actually teaches you (and how it changes your photos)
- Gear checklist: the tripod is not optional
- Stop 1: Photo Exploring through the light shift
- Nyhavn at night: old houses, bright reflections, and easy compositions
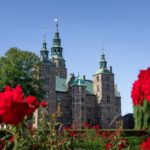
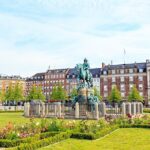
- Queen’s Palace area: photographing grandeur without overexposing
- Opera House and Parliament: long exposure skills on big landmarks
- Post-processing tips you can use right away
- Price and value: what you’re paying for at $233.63
- Weather, walking pace, and comfort in Copenhagen
- Who should book this Copenhagen photo walk
- Should you book this night photography tour?
- FAQ
- How long is the Copenhagen City of Lights PhotoWalks Tour?
- Is the tour private?
- What language is the tour offered in?
- Where do you meet and where does it end?
- What landmarks will I have a chance to photograph?
- Do I need a tripod?
- What photography skills are included?
- Does the tour run in bad weather?
- What is the cancellation policy?
Key points to know before you go
- Private focus for your group: your guide works only with your party, tailoring instruction to what you need.
- A real photography lesson, not just sightseeing: manual settings, composition, and light control are part of the plan.
- Tripod required for long exposures: this is how you capture those true night scenes and reflections.
- You’ll photograph the city’s famous lit landmarks: Nyhavn plus major buildings in the city center.
- All-weather walking with a short timeline: it’s about three hours, so you’ll want comfortable shoes and a good mindset for weather changes.
Why Copenhagen’s blue hour matters for night photos
Copenhagen has a special kind of light after sunset. Right as the sky shifts between blue hour and actual night, the city starts doing something photogenic: lights switch on, reflections show up, and colors become more even across buildings and water. That in-between period is where your images can look both moody and clean, without the total darkness that can make focusing frustrating.
This tour is built around that change. Instead of starting when it’s already fully dark, you move through the scene as it transforms. That matters because night photography isn’t just about turning on night mode. It’s about controlling how long your camera records light, and how your composition handles those moving patterns of illumination.
You can also read our reviews of more city tours in Copenhagen
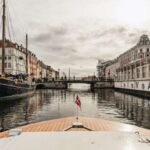
Meeting at Nyhavn and ending near Kongens Nytorv
You start at Memorial Anchor, Nyhavn 1F, 1051 København, Denmark. From there, you walk through central Copenhagen, photographing key landmarks along the way. The tour ends back close to where you started, near the Metro station at Kongens Nytorv.
That location choice is practical. Nyhavn is easy to recognize, and ending near a metro stop helps if you want dinner or a quick transit hop afterward without cramming in extra walking. It also means the walk stays tight enough to fit the ~3-hour timing, instead of turning into a long marathon.
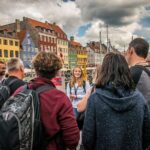
What the guide actually teaches you (and how it changes your photos)
This isn’t a generic city tour with camera tips sprinkled in. The guide is a trained photographer, and the plan explicitly targets the skills that make night photos look intentional.
You can expect coaching on:
- Manual camera settings like aperture, shutter speed, and ISO
- Creative composition using perspective, lines, and color
- How light behaves when you lengthen exposure times
- Long shutter speeds and when to use them for the scene
- Tips and tricks for post-processing
The big value here is that you don’t just hear the theory. Your guide helps you apply it on real subjects in real lighting. If you’re new, you get a starting point that doesn’t overwhelm you. If you already shoot manually, you’ll likely appreciate the focus on exposure decisions and practical composition.
Gear checklist: the tripod is not optional
The tour requires you to bring a tripod. That’s because long exposures are part of the core experience. In night photography, handheld shots usually end up either blurry from camera shake or too noisy from high ISO settings.
With a tripod, you can:
- slow shutter speeds down without fighting shake
- keep ISO under control
- spend more time thinking about framing and light rather than battling movement
If you only have a small, lightweight tripod, that’s still useful. You’ll just want it stable and sturdy enough for low-light conditions.
Stop 1: Photo Exploring through the light shift
The heart of the experience is a laid-back, ~3-hour walk timed for the city’s lighting change. The tour description focuses on the moment just before sunset fully becomes night, when Copenhagen switches from natural dusk tones into an atmosphere driven by street lamps and building illumination.
That shift affects three things you’ll notice on the spot:
- Exposure choices get easier when you can see how much light the city supplies.
- Reflections become stronger on surfaces like water and glossy stone.
- Color consistency improves compared with trying to shoot only in late darkness.
During this walk, the guide helps you pick angles and settings for the landmarks around you. The aim is confidence: you should leave with more clarity about what to do when the light changes, because it always does.
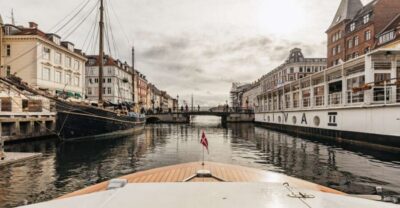
Nyhavn at night: old houses, bright reflections, and easy compositions
Nyhavn is one of the best places in Copenhagen to learn night photography because it offers both texture and repetition. You’ve got the classic old houses, plus a “mirror effect” vibe from the water and moody reflections from the lights.
This is where the guide’s composition coaching becomes concrete. You’ll work with:
- Perspective so the scene feels deep, not flat
- Lines from building edges and waterfront angles
- Color from the mixed lighting in the area
Even if you’re still figuring out manual settings, Nyhavn gives you strong visual cues: you can see what’s bright, what’s dim, and how highlights behave.
One practical note: because it’s a central, famous area, you’ll likely want to be extra patient setting up. Tripod in place, take a breath, and let the scene settle. Good night photos often come from timing, not speed.
Queen’s Palace area: photographing grandeur without overexposing
The tour includes the Queen’s Palace area, which gives you a different challenge than Nyhavn. Here, the city’s light meets larger architectural surfaces. That can be great for cinematic frames, but it also means highlights can get blown out if your settings are careless.
This is where the guide’s focus on exposure and light control pays off. The instruction you’ll get on aperture, shutter speed, and ISO is meant to help you keep the building details from turning into bright blobs. You’re also learning how to balance enough light for structure while still capturing the night mood around it.
Look for angles where you can show both the building and the way lights fall across it. That’s often more satisfying than just photographing the most lit face head-on.
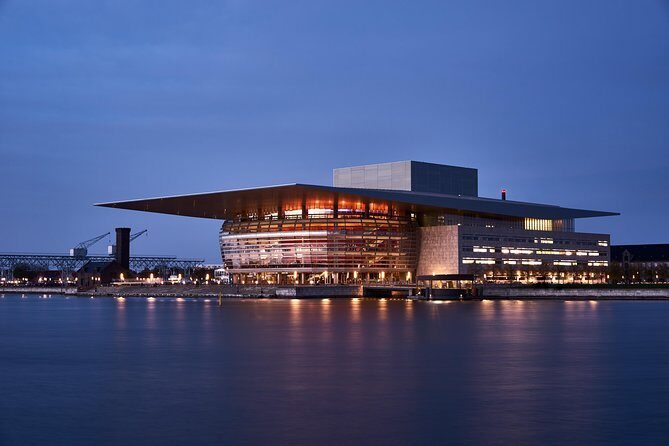
Opera House and Parliament: long exposure skills on big landmarks
Two standout landmarks in the plan are the Operahouse and the Parliament. These are great subjects for night photography because they combine bold shapes with strong lighting. Big buildings can look stunning in night photos, but they can also look flat if your composition is lazy.
That’s why the tour emphasizes composition skills like perspective and lines. The goal is to help you build frames that feel intentional:
- include leading lines or strong geometry
- use the surrounding darkness to frame brighter elements
- treat lighting as part of the composition, not just something in the background
Long shutter speeds are especially relevant here. When done well, longer exposures can smooth out some of the chaos in city scenes and let the architecture look crisp while light trails or glow effects add atmosphere. If you’re new to that, don’t rush. Set up carefully, try a couple of variations, and let the guide help you interpret what you’re seeing.
Post-processing tips you can use right away
The tour includes tips and tricks for post-processing. That matters because night photos often look different on your screen than they do in real life, and you may need a few adjustments to match your vision.
While you won’t get a full editing workflow described in the tour overview, you can expect practical guidance aimed at making the final image feel like what you noticed while shooting: balanced exposure, usable color, and cleaned-up highlights.
The best part is that your guide’s advice is connected to the settings you used in-camera. That makes it easier to understand why a photo needs a certain adjustment, instead of treating editing like random trial and error.
Price and value: what you’re paying for at $233.63
At $233.63 per person for a ~3-hour private tour, the cost isn’t small. This price only makes sense if you value instruction and want your guide focused entirely on you.
Here’s the value equation:
- You get a private photographer guide, not a shared group walkthrough.
- The tour is built as a photography lesson: manual settings, composition, and long exposure use.
- You’re photographing multiple major landmarks in one tight window, timed to lighting conditions.
There’s also a practical group benefit: the tour is private, but you can bring up to 3 friends or family members included in the price. If your booking includes a small group, the per-person value improves fast. If you’re solo, you’re still paying for one-on-one coaching and the time saved by learning on-location rather than experimenting alone.
My advice: treat this as a skills investment. If you want better night photos quickly, and you’re willing to carry a tripod, the price can feel fair.
Weather, walking pace, and comfort in Copenhagen
The tour operates in all weather conditions, so dress appropriately. That’s not a vague suggestion. It affects your photos because rain or mist can change reflections and contrast. But it also affects your comfort because you’ll be walking and setting up gear for longer exposures.
Bring shoes you trust. You’ll be out for about three hours, and night photography is slower than sightseeing. You’ll spend time composing, adjusting settings, and waiting for the right light behavior.
Since the meeting and finishing areas are near public transportation, you’re not stuck far from the rest of the city after the tour. That’s a big plus for planning dinner or a warm indoor break.
Who should book this Copenhagen photo walk
This tour is a great fit if:
- you want night photos of Copenhagen that look intentional, not accidental
- you want hands-on help with manual settings and long shutter speeds
- you prefer a private guide who can tailor pacing and instruction to your level
- you’re excited to photograph landmarks like Nyhavn, the Opera House, and Parliament during lit evening conditions
It may feel less ideal if:
- you want very late-night shooting with a fully dark sky every time
- you don’t want to carry and set up a tripod
- you’re only interested in casual sightseeing with no desire to change camera settings
Should you book this night photography tour?
Book it if your goal is learning and better night images. The private format and pro photography guidance are the core strengths, and the tour is built around the most useful lighting window—between blue hour and night lights. The tripod requirement is real, but it’s also what makes night photography results improve.
Skip it (or at least reset expectations) if you hate gear setup, or if you’re chasing a hard requirement for deep-dark conditions. This experience is about the city’s light shift and getting consistent results with longer exposures.
If you’re the type who likes to understand what your camera is doing, you’ll probably leave more confident than you arrived.
FAQ
How long is the Copenhagen City of Lights PhotoWalks Tour?
The tour is about 3 hours.
Is the tour private?
Yes. It’s private, and only your group participates.
What language is the tour offered in?
The tour is offered in English.
Where do you meet and where does it end?
You meet at Memorial AnchorNyhavn 1F, 1051 København, Denmark. The activity ends back at the meeting point area, close to the Metro station at Kongens Nytorv.
What landmarks will I have a chance to photograph?
You’ll have a chance to photograph Nyhavn with the lights on, the Queen’s palace, the Operahouse, the parliament, and other sites along the way.
Do I need a tripod?
Yes. A tripod is required because the tour involves longer exposures.
What photography skills are included?
You’ll learn about manual camera settings such as aperture, shutter speed, and ISO, plus composition using perspective, lines, and color. The tour also covers the influence of light, long shutter speeds, and tips for post-processing.
Does the tour run in bad weather?
It operates in all weather conditions, so you should dress appropriately.
What is the cancellation policy?
You can cancel for a full refund up to 24 hours in advance of the experience start time.